Thursday, April 18, 2019

Oracle EBS R12.2 Online Patching (ADOP)


Apply patches Oracle Apps EBS R12.2.X


(Online Patching Using ADOP Utility)


Introduction:

As we know that applying patch in ORACLE EBS R12.2.X is different than R12.1.X. SO From R12.2.0 onward oracle has introduced online patching functionality called ADOP.

ADO: Stands for Application DBA Online Patching and Introduced in EBS R12.2. The adop utility is used to apply patches to Oracle E-Business Suite without significant system downtime. 
Oracle EBS 12.2 introduces Online Patching, a new feature that seriously reduces the downtime that was needed in previous releases for application of Release Update Packs (RUPs), Critical Patch Updates (CPUs), and other patches and bug fixes of different kinds.


EBS R12.2.X have are 3 File System Installed.

1.  FS1 – RUN_EDITION:
Production file system that is used by online users when system is being patched.
2.  FS2 – PATCH_EDITION:
Exact copy of production (fs1) used by the patching tools. Changes do not affect the running application (RUN_EDITION). 
When patching is completed and we do CUTOVER, then patching tool swaps the FS1 and FS2 file systems. It means, FS2 file system will become FS1, which will be access by the users.
3. FS-NE_Non-Edition:
This is a non-edition file system which stores data that is stored in a file system like log file, report file and patch top files.

Oracle EBS Online patching- ADOP Consists Below Phases:

FIVE PHASES:

1.     PREPARE  
2.     APPLY
3.     FINALIZE
4.     CUTOVER
5.     CLEANUP

Steps:

Ø  Download the Patch and unzip on patch_top.($NE_BASE/EBSapps/patch)
In my case is: /u01/patches/
Ø  Set the environment or Source (. ./EBSapps.env) in my case is: /u01/test/
Ø  Make sure and check run level 
Ø   Check status
$ adop -status
Ø   ADOP Syntax
adop phase=<phase_name>
Ø  Before start phases make sure export JVM  
  export CONFIG_JVM_ARGS="-Xmx3072m -Xms1024m"

1.     PREPARE PHASE

 Prepare to start a new online patching cycle by using below command


$ adop phase=prepare


Wait for the prepare phase to be complete.
Note: Please check log file as mention prepare phase while running commands
Please check the status from below points:

$ adop -status
Enter the APPS password:
Enter the WEBLOGIC password:
Enter the SYSTEM password:


2.     APPLY PHASE

Apply one or more patches to the patch edition of an Oracle E-Business Suite system by executing the following commands:

Syntax:
$ adop phase=apply patches=Patch_Number
$ adop phase=apply patches=Patch_Number1, Patch_Number2, …


$ adop phase=apply patches=26050719


Enter password as required during this phase like below:

Enter the APPS password:
Enter the WEBLOGIC password:
Enter the SYSTEM password:

Wait for the APPLY phase to be complete.
Note: Please check log file as indicate while running this phase command.

At the end status must be like below, In every phase status must be success.
The prepare phase completed successfully.
adop exiting with status = 0 (Success)

3.     FINALIZE PHASE

Perform the final patching operations in this phase by using the following command (which can be executed while the application is still online.


$ adop phase=FINALIZE


Enter password as same as enter in step 1,2.
Wait for the FINALIZE phase to be complete.

Note: Please check log file as indicate while running this phase command 

4.     CUTOVER PHASE

Transition to the patched environment 


$ adop phase=CUTOVER


Enter password as same as enter in step 1,2 and 3.
Wait for the cutover phase to be complete.
Note: Please check log file as mention apply phase after run command..

5.     CLEANUP PHASE

Remove old objects that are no longer needed from the patch process by running below command


$ adop phase=CLEANUP


Enter password as same as enter in step 1,2,3 and 4.
Wait for the cleanup phase to be complete.

Note: Please check log file as indicate while running this phase command 
At the end status must be like below, In every phase status must be success.
The cleanup phase completed successfully.
adop exiting with status = 0 (Success)

Now Check Status.

Keep Smile 😊

Reference:
Oracle EBS R12.2 Official Guide


Tuesday, January 1, 2019

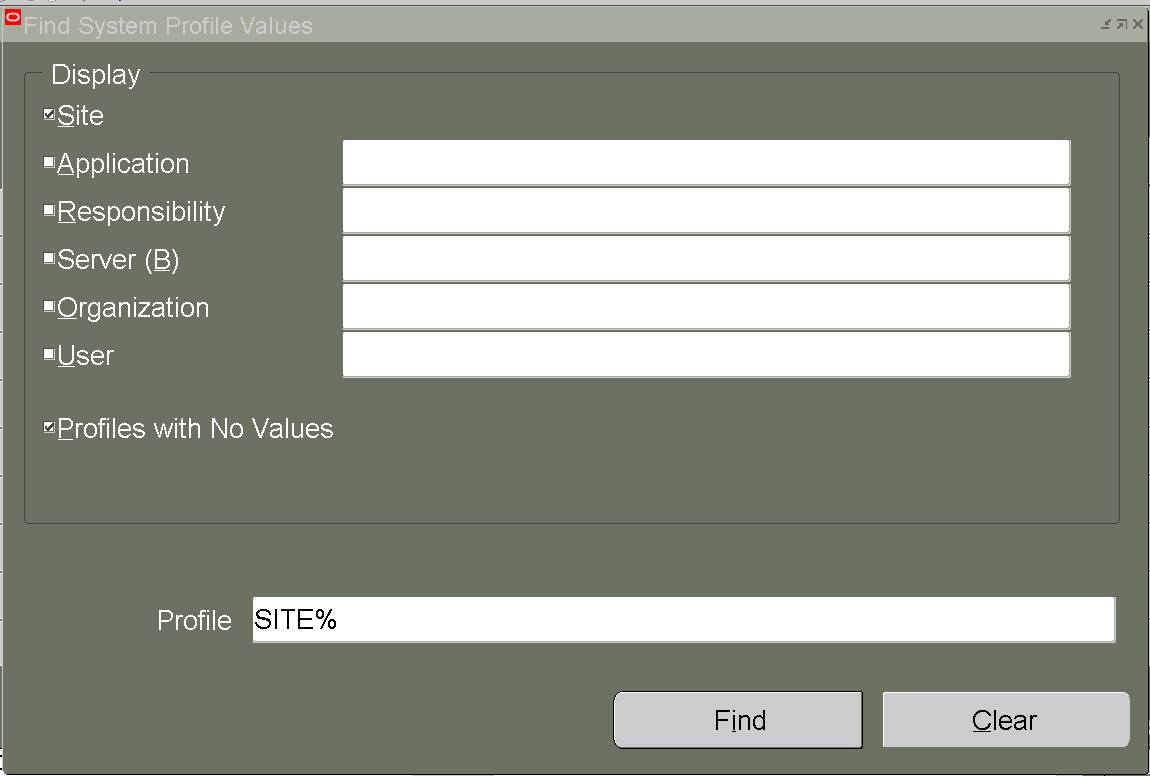
Change Site Name in EBS r12


Step1: 

Login and choice the system Administrator Responsibility and choice  profile->system


Step2:  Query the profile option in "SITE%"


Step3: Change the site name in your environment name like ODA-DEV 1-7-2024


Step4: Save the settings and logout the application after login and check your modified site name in EBS


Friday, August 31, 2018

Audit Vault Agent Deployment on Target Host

Audit Vault Agent Deployment on Target Host


Summary;
  1. Install java 1.6 or above and Set path in user profile
  2. Download Agent from Audit Vault console
  3. Target host must be register in Audit Vault
  4. Install and Start Audit Vault Agent on Target
  5.  Start or activate Audit Vault Agent on Target
  6.  Agent Start, Stop and Status on target
     ------------------------------------------------------------

1.     Install java 1.6 or above

 Set JAVA_HOME and Path in user profile
 $ Vi .bash_profile
 export Java_HOME=/home/oracle/jrockit-jdk1.6.0_45-R28.2.7-4.1.0      
 export PATH=$JAVA_HOME/bin:$PATH
 save .bash_profile


2.     Download Agent from Audit Vault console

  Ø   Login as AVADMIN
  Ø  Host  => Agent
  Ø  Click Agent Release and Download


3.     Target host must be register in Audit Vault


  Ø Login audit vault as AVADMIN
  ØClick on register
  
  ØEnter required information of target host
    => Hostname:
    => IP address:

Ø  Click save

4.     Install Audit Vault Agent on Target

  Ø  Agent installation on Target Host:

 [oracle@dbvault ~]$ java -jar /u01/agent.jar -d /u02/avagent

 Checking for updates...
 Agent is updating. This operation may take a few minutes. Please wait...
 Agent updated successfully.
 Agent installed successfully.
 If deploying host monitor please refer to product documentation for additional installation steps.

 [oracle@dbvault ~]$

Note:

/u01/agent.jar                  => downloaded agent file location
/u02/avagent                    => Audit vault desire installation location 

5.     Start or Activate Audit Vault Agent on Target

To activate please note agent key from Audit Vault server;

  Ø  Login Audit vault as AVADMIN
  Ø  Note agent key from Audit Vault console
         Agent key:
         N#E9-WWEW-XGDL-STSU-MBFA                    (kay may change as per AVDF)

  Ø  Start Agent on target with activate key

 $ cd /u02/avagent/bin
 [oracle@dbvault bin]$ ./agentctl start -k
 Enter Activation Key:                                      => Enter / past above noted agent key
 Agent started successfully.

 [oracle@dbvault bin]$

6.     Agent Start, Stop and Status on target

 $ cd AGENT_HOME/bin 
 $ ./agentctl status
 $ ./agentctl status
 $ ./agentctl status


INSTALLING AND ENABLING HOST MONITORING ON TARGET HOST

Prerequesites;

Install following rpms
•  libpcap
•  libpcap-devel
•  openssl
•  openssl-devel

Download the above rpms from http://www.tcpdump.org/

On an Oracle Linux system execute following command from root user

•  Yum –y install libpcap libpcap-devel


Installing a Host Monitor in oracle AVDF 12.1.2 on Linux Hosts

•  If you have not already done so, deploy the Audit Vault Agent
•  Log in as root and identify a root-owned directory on the local hard disk, such as 
   /usr/local.
•  Log in to Audit Vault Server console as an administrator, click on HOSTS tab, and 
   click on Agents
  Click the download button next to Host Monitor (Linux x86-64) 
•  Then save the .zip file to root owned directory, for example /usr/local 


•  Place the .zip file in directory /usr/local and unzip it


•  This creates a directory named hm.
 
•  Ensure that the hostmonsetup file (in the hm directory) has execute permission.
•  Run the following command
    [root@12cdb hm]# ./hostmonsetup install


Monday, August 20, 2018

Register Database Firewall with Audit Vault Server 12.2.0.8


Register Database Firewall with Audit Vault Server  12.2.0.8


Summary:
1.    Specify Audit Vault Server certificate and IP address in Database Firewall
2.    Register Database Firewall in the Audit Vault Server
3.    Database Firewall Status and Diagnostics
Note:
You must associate each Database Firewall with an Audit Vault Server by specifying the server’s certificate and IP address, so that the Audit Vault Server can manage the firewall. If you are using a resilient pair of Audit Vault Servers for high availability, you must associate the firewall to both servers.

1.    Specify Audit Vault Server certificate and IP address in Database Firewall

Ø  Log in to the Audit Vault Server as AVADMIN


Image:01
Click Login


Ø  Copy Audit Vault Server certificate


ð  Click on Settings tab
ð  In Security menu, Click Certificate. The server’s certificate is displayed
ð  Copy server certificate into a text file, Make sure you also copy the header and footer “----BEGIN CERTIFICATE---- and ---- END CERTIFICATE ----” Note: if you use a text file it must be securely deleted afterwards.

Image:02


Ø  Log in to the Database Firewall administration console

Image:03
Click Login


Ø  In System menu, click Audit Vault Server

ð  Enter IP Address of the Audit Vault Server
ð  Paste the Audit Vault Server Certificate in the next field
ð  Click on Apply button

Image:04

NOTE:
If you are using a resilient pair of Audit Vault Servers. select Add Second Audit Vault
Server check box, and enter the IP address and certificate of the secondary Audit Vault
  Server 


Image:05

Setting Saved.

1.    Register Database Firewall in the Audit Vault Server

You must register the Database Firewall in the Audit Vault Server to enable communication between Audit Vault and Database Firewall. To register a Database Firewall in the Audit Vault Server

ð  Log in to the Audit Vault Server as an administrator “AVADMIN”

Image:06

Click Login

2.    Register Database Firewall in Audit Vault Server


ð  Click on "Firewall" tab
ð  Click on "Register" button.

Image:07

 Ø  Save Registration

ð  Enter name of the Database Firewall in the "Name" field.
ð  Enter IP Address of the Database Firewall in the "Address" field. It is preferred to use the actual hostname for the firewall that you had set earlier. It makes it easier to keep track of servers in production environment.
Click on "Save" button


Image:08

Ø  Registered Firewalls
 You will see screen like in below screenshot if you have successfully completed above steps.

Image:09

3.    Database Firewall Status and Diagnostics

Ø  Click on System Status under System
Click on Show Reports

Image:10
Click on Show Report

Ø  To ensure that everything is running correctly
ð  Everything should have a green "OKnext to it like in the next screenshot

Image:11

Note:
If there is an error message that indicates that there is a problem with the certificate, Check that the date and time are the same on the Audit Vault server and database firewall appliance.


References:
Oracle® Audit Vault and Database Firewall Installation Guide
Release 12.2


Oracle Golden Gate 21c Microservices Installation

Oracle Golden Gate Microservices Architecture Oracle Golden Gate Microservices Architecture has been introduced in Oracle Golden Gate versio...